After two years of gardening in my original raised bed, I decided it was time to expand. Afterall, I had already expanded in the virtual world (thanks Tap Ranch!) so it was time to get to work at home too. However, I also need to share the backyard for the occasional activities of my kids. So we opted to build a smaller 4x4 raised bed. Here are the plans so you can build your own too.
Step 1: the Supplies
4x4 pressure-treated wood cut into 1-foot pieces (qty. 4)
2x6 pressure-treated wood cut into 4-foot pieces (qty. 4)
3 1/2" lag bolt zinc screws (qty. 16)
2 1/2" lag bolt zinc screws (qty. 8)
Post hole digger
Soil (I prefer a mixture that my mother-in-law swears by and has worked for me in the past: rich topsoil on the bottom, followed by humus manure and peatmoss.)
2 Bayer Aspirin for when you're all finished
Step 2: Begin Assembling
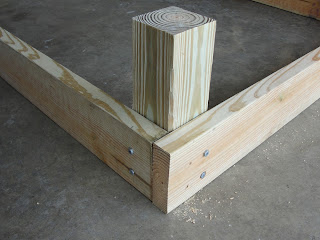
Begin by laying out the pieces and attaching the 2x6 pieces to the 4x4 wood with the 3 1/2" lag bolts into predrilled holes.
Notice the placement of the screws into the 4x4.
Continue working around until all four corners are attached. For extra reinforcement add the 2 1/2" screws into predrilled holes connecting the 2x6 pieces together. You would be surprised how many times my raised bed has been used by kids as a balance beam! These extra screws have kept it from falling apart. Continue to finish all four corners.
Step 3: Placement in the ground
Once the frame is assembled, position it where you want it. You'll need to mark the corners and begin digging holes with a post hole digger. Thanks to my neighbor for letting us borrow hers!
Once the holes are dug, flip the frame over into the holes. Make sure it rests evenly into each hole. If not, dig the holes deeper or larger as needed.
Step 4: Fill your raised bed
This is where I took over after the bed was built. In the past, we dug up all the grass which was REALLY tiresome! So this time I'm trying the method pinned around the world on Pinterest. Simply lay paper over the grass. I chose the leaf bags as my base since they are biodegradable. They kill the grass but disolve over time.
Next add the soil and enjoy planting!
If you want a traditonal 4x8 bed, just modify your 2x6 wood pieces to have two pieces 8' long and two 4' long. The rest of the steps are the same.
Linking up at the Clever Chicks Blog Hop


Looks great! I know my husband loves his raised beds :)
ReplyDeleteNow I need a fence. Something keeps trampling my stuff at night.
DeleteI'd love to do this! Thanks for sharing this easy tutorial and pics. We have wild cottontails so if we tried this we would need a cover of some type! :)
ReplyDeleteVisiting from the chicken chick~
Shawn
Thanks for stopping by! Happy Gardening!
DeleteGreat post. I love how you made your beds. A friend recommended your blog. I will be back for sure!
ReplyDeleteI am giving away a set of Ball Canning blue pint jars on my blog right now, I hope you'll stop by!
Lisa
Fresh Eggs Daily
http://www.fresh-eggs-daily.com/2013/04/giveaway-ball-heritage-collection-pint.html
Thanks Lisa! Just checked out your great blog and signed up for the jar giveaway. Hope I win. : )
DeleteGreat idea.....Thank you for sharing with the Clever Chicks Blog Hop this week; I hope you’ll join us again!
ReplyDeleteCheers,
Kathy Shea Mormino
The Chicken Chick
http://www.The-Chicken-Chick.com
Nice Post. It’s really a very good article.
ReplyDeleteHochbeet Selber Bauen
This comment has been removed by a blog administrator.
ReplyDeleteWelcome to the party of my life here you will learn everything about me. Mattress Quilting Machine
ReplyDeleteIn addition to considering what size camper is right for you, you’ll also want to consider the towing vehicle. Tacoma Bed Cover
ReplyDelete