Wednesday, October 23, 2013

Signs of Autumn in the Garden

[I'm temporarily back from my hiatus.  After a very rainy season, with not much to do but harvest in between rainfalls, and beginning cyber school at home with my oldest son, I'm back for a quick garden update.]

Fall is all around us.  We see it in the beauty of the leaves changing colors and, the long shadows of the sun and the tremendous sunsets we've been blessed with recently.  However, we also see it in the dying summer flowers and withering gardens.  Autumn is here and frost is around the corner.  Before Jack Frost hits the last of the garden, I wanted to share some shades of fall.
Euonymus (Burning Bush)
They call this a burning bush for a reason!  Come fall, the leaves turn bright red.  It's beautiful.  Unfortunately, they also grow really big, and recently were named one of the top 10 "invasive" bushes for our area. 

"Autumn Twist" Azalea
A blooming azalea in the fall?!  That's exactly what I thought when we bought this little guy back in 2004.  Being the skeptic that I am, I figured it was a scam by the garden center.  Afterall, we all know that azaleas bloom in the spring.  However, this variety is called Autumn Twist because it blooms in the spring and then reblooms in the fall again! 
 
 
And then there's this ugly thing on the other side of the yard.  My once gorgeous tomato plant that was taller than my husband, is now slumped over with dying leaves.  Any gardener would be tempted to put it out of it's misery, except that it's earned it's stay by giving me 6-10 tomatoes EVERY day still!  They may be small, but they're still red and juicy.
 
Holly getting itself ready for Christmas
When preparing your gardens, it's really important to make sure you have year-round color.  The holly bush is a great example of how to add color year round.  This little bush was "rescued" from a friend's yard when they no longer wanted it.  The red berries look redder as a sign that the crisp days of autumn are upon us and it will soon be ready to adorn a fireplace mantle or shelf for Christmas.

Monday, August 26, 2013

When Your Garden Smiles Back at You! (Harvest time for Jack-be-Littles)

One of 13 adorable pumpkins!
One of my favorite Philadelphia Mummer's Songs to hear on New Year's Day is "When You're Smilin'".  It not only reminds me of my PopPop, but also makes it impossible not to smile!  So as I put my kids on the bus today for the first day of school, I couldn't help but smile.  This same day that is a day of sitting at desks for them, is freedom for Mom's everywhere!  That also meant more time for me to get back to the garden.
 

While I was away doing back-to-school shopping, my Jack-be-Littles all turned orange.  It's harvest day for this gardener!  And don't you just love when your garden smiles back at you!  Sing with me. 

"When you're smilin' keep on smilin'
The whole world smiles with you
And when you're laughin' oh when youre laughin'
The sun comes shinin' through..."

[Shared at: Clever Chicks Blog Hop]

Friday, August 16, 2013

Pico de Gallo Overwhelmed by Cilantro and Stink Bugs


It looks innocent now, but wait till you smell it!
With the overabundance of tomatoes, I decided to get creative and experiment with some recipes.  I'm a huge fan of eating a tomato sliced with salt.  I love them.  I grew up with the deliciousness of the "Jersey Tomato" just over the border.  So when my garden gave me plenty, and some even tasting Jersey-ish, we have eaten our share.  My husband calls it the "no option salad" we get every night with dinner. 

Last year I made at attempt at homemade marinara sauce that was a big fail.  I guess I'm just a store-bought sauce girl.  So this year I decided to try my hand at yummy pico de gallo.

So armed with a knife, cutting board, homegrown tomatoes and red onions, I started chopping.  Then came the other ingredients including the store-bought Cilantro.  Now let me back up a minute to yesterday when I bought this cilantro at Wegmans.  By the time I got to the check out, I asked the cashier what smelled of stink bug.  She didn't smell it.  Hmmmm.  In southeast PA, and many other areas, we're still recovering from the invasion a few years ago.  The bug's name is appropriate, it stinks!  When I got home, the smell was overwhelming coming from the groceries in the back of the car.  I thought for sure a stinkbug had hitchhiked home in my bags.

So what do stink bugs and cilantro have in common? Apparently, a lot!  They both smell alike.  Turns out, cilantro smells (and tastes) like stink bug to some people.  To other people, it somehow tastes very different with almost no smell.  I don't get it.
 

So I chopped it up convinced that when all the yummy ingredients blended together, that I would not taste the cilantro. That's like saying you won't taste the coffee in one of those frou frou Starbucks concoctions.  Oh, it looked so pretty.  And it made my wrap look so healthy.  However, one bite into it and STINK BUG taste!  Yuck!  My lesson from the garden for this week is to leave out the cilantro next time!

Monday, August 12, 2013

Garden Update: A day in the garden in photos

If you live in the Northeast, you'll agree this was a crazy summer of high heat and lots of rain!  If it wasn't a heat wave, it was raining.  Sometimes, we had both!  Apparently, this was great for my garden and the daily harvest is still so much that I have to share.  In fact, sometimes I think my neighbors are tired of me begging them to help me eat all the tomatoes.  That said, here's an August update in pictures.  Enjoy!

Six heirloom tomato plants gone wild!  I've picked over 100 tomatoes already!
 
Cherry Tomatoes almost ready
 
The cucumber outgrew it's trellis so I spread the tomato trellis around the back. 
It came all the way down the other side to make a tent perfectr for a kid.
 
Cucumbers hiding under the trellis


The Jack-be-Littles aren't so little anymore!  The plant has wound around the house!
 
There's at least a dozen of these tiny pumpkins hidden through the two plants. 
Can't wait for them to turn orange!


The 3 zucchini plants have been the under-producers this year.  I've only picked 4 zucchini so far. 
This time last year I had at least 2 dozen!
 
We can't forget the flowers.  Here's the mandevilla I added to the deck this year.
 
The roses are also gorgeous again!
 
After the camera was put down, I found six huge cucumbers waiting to be picked!
In a few weeks, the cucumber vines should be withered and I'll be ready to plant my fall lettuces and other cold-weather crops.  It's been a great season already!

Friday, July 26, 2013

Tomato and Cucumber Update

One day's harvest!
My favorite salad ingredients are the tomatoes and cucumbers.  So when I saw my plants growing like weeds this summer, I got excited.  And now, earlier than ever in my garden, the tomatoes are ripening.  They're ripening really fast! 

Just this morning I gave away almost 10 tomatoes just from yesterday.  So I was suprised when I went out and needed my son's help to carry in the "load".  Just today, we picked 22 tomatoes and 4 cucumbers.  There's still plenty of tomatoes that will be ready tomorrow!  It's so satisfying to grow enough in the garden to share with others.  So if you're local, come help us eat these!

Wednesday, July 17, 2013

Jack-be-Littles in Little Spaces

Morning in my tiny pumpkin patch next to the dahlias
When the free packet of seeds arrives in the mail, and they always do, I have a hard time throwing them out.  Where these seeds come from is far and wide.  They might arrive from a garden society, or come free with a mail flyer.  The best arrival was after I carefully picked my heirloom seeds from a catalog, they sent a "complimentary" packet of melon seeds that I did not plan to put in my garden.  It wasn't a small veggie they sent but melons!   

My huband says to just throw them away.  They were free.  He says I'm not obligated to use them.  But I must.  The drive to plant is stronger than the urge to purge.  And so I look for spaces to plant these seeds (if I can't find them another home).  This was the case with those adorable tiny pumpkins you see in the fall.  They're called Jack-be-Littles.  They're really more a gourd than a pumpkin but who cares.  They're cute pumpkins to the kids.  And so the seed packet sat on my counter.  I couldn't throw it out but I didn't want to use precious garden space for a plant with vines.  So I thought vertical.  And then I thought of the trellis where the dahlias didn't grow last year.  So I took a chance. 

Going Vertical
Except for the morning, this spot gets 8+ hours of sun a day!  It's perfect.  And unless it wants to grow beyond the small space I've given it, I think these seeds found a great piece of real estate.  So I hope the Great Pumpkin will be pleased this autumn.  It might not be the largest pumpkin patch, but it will most likely be the most creative one.  At least in my neighborhood.
This is what I hope I'll find later in the season!

Monday, July 8, 2013

How to Support the Monster Tomatoes

Huge tomatoes and it's only  July 7th!
My tomato plants are gigantic!  I mean huge.  Bigger than I've ever grown.  Maybe some of you out there grow them this big every year and my photo is nothing new.  However, in my neck of the woods, I'd be lucky to have them this tall by the end of the season, NOT beginning of July.  How tall are they?  Well, look at the picture again.  That's my husband peeking out from behind them.  (He is 5'10".)  This is after I already trimmed the plants back!  That's tall for tomatoes in my book!

How this luck descended upon my garden I'm not sure, however, there were three new variables thrown in the mix this year.  First, I bought heirloom seeds.  The tomatoes in this garden are all heirloom varieties (Cherry, Thessaloniki, and Moneymaker).  Second, it's a new garden bed which means all new soil.  Third, I pruned the tomatoes early on this year.  Apparently, this is basic knowlege, for growing tomatoes, but I had never pruned before.  So add all of those new varaibles together and we have a trifecta for giant tomatoes!  And then the rains came bringing the damaging winds.
A collection of anything that can support these tomatoes!  (cages, plastic, and steel)
This is when I realized that my tomato cages and tomato stakes were not enough.  So I was off to Home Depot for Steel rods.  Then, it hit me, my plants were becoming like Medusa with branches getting so heavy that they needed more support.  And this gardener was done forking out money.  So we improvised.  We had just completed a "cleaning out project" that included purging from the basement, when my husband reminded me that the shelf brackets would be great.  So I bent them, hammered them in the ground, and voila!
Recycling old shelving pieces!
Just to make sure they worked, a new storm blew in last night with plenty of wind.  Every single branch was fine.  No more snapping off like in previous storms.  Now if they would just hurry up and ripen because I can't wait to try them!

Monday, June 24, 2013

Purple Beauties!

Ready to harvest!
My red onions are harvested and they look delicious!  Feeling so proud of these purple beauties right before harvest, I had done a quick Google search to see if there was anything I needed to do other than pull these babies out of the ground.  To my surprise, they grew so well, because onions are simply easy to grow! I had great success with my shallots last year so I decided to try the red onions for all my yummy Greek summer dishes.  One website basically burst my gardening bubble when it said, "if you can poke a hole in the ground, then you can grow an onion."  To tell you the truth, that really is all there is to it!
1. Poke a hole
2. Place the onion bulb in the hole
3. Cover with soil
4. Water and Wait
5. Pull it out when ready and let dry (do not rinse off the dirt!)

This is just half of the harvest!

That's it folks!  It doesn't get easier than that.  Once the green has dried out, just use scissors to snip them off as well as the roots.

Wednesday, May 29, 2013

Happy Birthday to Me with Gardening Shoes!

Gardening shoes from Gardeners Supply
My husband is a runner.  He has been for years, except for a time when he became a triathlete for a few years and is now branching off this year into mud runs.  However, at his core he's a runner.  That means all gift-giving tends to be focused around running.  There's shoes, and apparel, and water bottles and all sorts of accessories including heart monitors.  However, after so many years, the gifts get boring.  I start to moan, "not another list of gift ideas just for running." 

Well, I think I've become close to one-sided with gardening.  Most husbands shop for jewelry or flowers or clothes for their wives.  Mine got me just what I wanted...new gardening shoes!  Not just any gardening shoes though.  These are gardening clogs that are the best!  Years ago, he got me a pair when I first started gardening.  I thought they were a little dorky, but practical.  I didn't realize how much I'd grown to love their practicality and comfort until my one cracked near the top.  I tried to wear it anyway, but the crack pinched my skin.  So with a birthday looming on the Memorial Day horizon, I hinted at another pair.  Ok, let's be honest, I ordered them myself and said he could give them to me for my birthday.  And that's how I got my new pair in navy blue!  They're wonderful. 

[You can find them at Gardeners Supply (www.gardeners.com).]

Monday, May 20, 2013

Spring Gardening (slow start but finally here)

This Spring, the cold seemed to just drag on and on in the Northeast.  It was a very slow start to the gardening with seeds taking longer to sprout and plants taking longer to grow.  And although I'd be harvesting more by now, I'm just thrilled that the garden looks so robust.  And thanks to the covering of tarps, everything survived the Mother's Day frost.  So here's what's growing so far. 

Spring crops as of May 20, 2013
From the far left 1/3 of the bed, there's sugar snap peas with romaine and carrots behind them.  Then in the center are red onions (find the tall shoots), followed by more romaine that is smaller because it was started from seed.  The final third of the bed on the right contains two rows of loose leaf lettuce (the lighter green) that is already growing back from the harvest of last week!  In between the lettuce was radishes that were also harvested and eaten last week, except for two more hanging on.  The last row on the right are more red onions.  Can't wait to eat all this food!  And the best part is that there's too much to eat so just with the two rows of loose leaf lettuce alone, I was able to feed 3 other neighbors! 

Makes you just want to grab a fork and start eating!
Here's a different angle that includes the 6 tomato plants growing in the background.  These were also started indoors under the grow light.  It's going to be a yummy summer!  Stay tuned for what will be planted after all these spring veggies are harvested.  In the meantime, add your link and share what's growing in your garden.

Wednesday, May 15, 2013

Lettuce Time! Harvesting Loose Leaf Lettuce

Lettuce ready to harvest (notice most of the radishes to the left are already eaten)
The general cry these days is "Buy Local".  I'm all for supporting the local farmer.  And this year my town started its very own Farmer's Market.  Yay!  It was a packed day at the opening of the Downingtown Farmer's Market.  Many farmers sold out within the first two hours (the market was from 3-7pm).  However, as I was ready to make my way back to the market this week, I realized that my own garden is brimming over and I better start eating!  The loose-leaf type lettuce is ready, the radishes we started eating last week, and the romaine is charging right along too!  So "buy local" has become "eat local", as in my own backyard.
Cut near the base and it will regrow!
I fell in love with romaine lettuce many years ago.  However, I fell in love with growing the loose-leaf varieties because you can harvest up to 3 times from the same seed.  That's right!  When it comes to harvesting the lettuce, you simply snip it about 3/4" from the base.  I use regular scissors to cut the lettuce.  Then simply wait and it will grow right back!  If you planned ahead and staggered your seed planting, then you could end up eating one row at a time and end up back at the first row already regrown.  I did stagger this year, however the cold spring we had stunted the growth.  When they finally really took off growing, they were all the same height.  Oops.  So that means there's lots of sharing going on in our house with neighbors and friends.  So keep an eye on your lettuce and whenever possible, support the local farmer too!
 
If you're near Downingtown, PA, check out our new farmer's market on Thursdays, 3-7pm. Click here for more information.
Growing Roots Logo

Monday, April 15, 2013

Build Your Own Raised Bed for Small Spaces (DIY)

After two years of gardening in my original raised bed, I decided it was time to expand.  Afterall, I had already expanded in the virtual world (thanks Tap Ranch!) so it was time to get to work at home too.  However, I also need to share the backyard for the occasional activities of my kids.  So we opted to build a smaller 4x4 raised bed.  Here are the plans so you can build your own too.

Step 1:  the Supplies
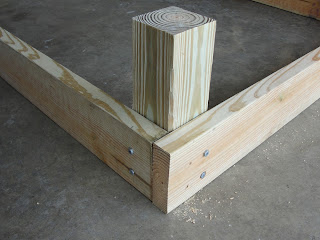
4x4 pressure-treated wood cut into 1-foot pieces (qty. 4)
2x6 pressure-treated wood cut into 4-foot pieces (qty. 4)
3 1/2" lag bolt zinc screws (qty. 16)
2 1/2" lag bolt zinc screws (qty. 8)
Post hole digger
Soil (I prefer a mixture that my mother-in-law swears by and has worked for me in the past:  rich topsoil on the bottom, followed by humus manure and peatmoss.)
2 Bayer Aspirin for when you're all finished

Step 2:  Begin Assembling
Begin by laying out the pieces and attaching the 2x6 pieces to the 4x4 wood with the 3 1/2" lag bolts into predrilled holes.

Notice the placement of the screws into the 4x4.
Continue working around until all four corners are attached.  For extra reinforcement add the 2 1/2" screws into predrilled holes connecting the 2x6 pieces together.  You would be surprised how many times my raised bed has been used by kids as a balance beam!  These extra screws have kept it from falling apart.  Continue to finish all four corners.

Step 3:  Placement in the ground
Once the frame is assembled, position it where you want it.  You'll need to mark the corners and begin digging holes with a post hole digger.  Thanks to my neighbor for letting us borrow hers!
Once the holes are dug, flip the frame over into the holes.  Make sure it rests evenly into each hole.  If not, dig the holes deeper or larger as needed. 

Step 4:  Fill your raised bed
This is where I took over after the bed was built.  In the past, we dug up all the grass which was REALLY tiresome!  So this time I'm trying the method pinned around the world on Pinterest.  Simply lay paper over the grass.  I chose the leaf bags as my base since they are biodegradable.  They kill the grass but disolve over time. 
Next add the soil and enjoy planting!

If you want a traditonal 4x8 bed, just modify your 2x6 wood pieces to have two pieces 8' long and two 4' long.  The rest of the steps are the same. 

Linking up at the Clever Chicks Blog Hop

Friday, April 12, 2013

Crazy Weather: When to Plant Tomatoes

Source
In early April, it appeared that winter was doing it's best to hang on here in Pennsylvania.  Then suddenly, we were hitting 87 degrees this week!  And just like that, today, the cold temps have blown back in for the weekend.  It's always difficult to know when to plant tomatoes and the other summer crops, but this crazy weather has left many scratching their heads.  Add to the confusion the fact that the stores are beginning to stock beautiful tomato plants tempting gardeners to buy and plant.  Therefore, this must be the perfect time, right?


While checking out at the grocery store, I overheard the cashier saying how he had just planted his tomato plants that he bought at Home Depot.  I wanted to lean in and tell him it was too early to plant, but my advice would have been too late.  Then I arrived home and noticed that my own tomatoes under the grow light look like they should in late May.  Apparently the grow light works!  I had to wonder if I could break the rules and be like the cashier, recklessly putting them in the ground whenever my gardener's heart desired!  But I know better.  Mother Nature bit me last year with a final late frost on April 27!  So when to plant?
Just 3 weeks after planting, they're getting so tall,
I'm running out of room to move up the grow light!
Assuming you already have your cold weather crops in the ground (lettuces, radish, carrots, onions, romaine, spinach, broccoli, etc.) I'm referring to the summer plantings.  The standard thinking is to plant them after the last frost.  However, no one knows when that will be so it doesn't make for great advice.  On the other hand, gonig with the most likely planting date (one that is 90% safely past the last frost) is your best option.  For Philadelphia, that would be April 10-19.  That's good news for those of us in this area!  We can start planting!  As for those outside the area, here's the link to a great chart to find your city (Almanac frost dates).

Meanwhile, the best planting date is still later.  My grandfather always said to wait till May, preferably Mother's Day weekend or later.  Afterall, it was April 27 last year when I took a chance and watched my sprouts get frostbitten.  If we do get hit with another frost, just remember to cover your plants.  Happy Planting!

Linked up at: The Clever Chicks Blog Hop

Monday, March 25, 2013

DIY Plant Grow Light Stand

The time had come for me to take my gardening to the next level.  I had spent two years drooling over the online grow light stands and shelves (up to $500!!), and it was time for us to make our own.  Notice the "us" which includes my handy husband.  I found some online plans, and my husband agreed to make it happen.  First thing I noticed, is that all the online plans were for a four-foot light fixture.  As  much as I'd love to have that much growing capacity, I didn't think we had room for it with two active boys also in the mix.  So we downsized to a 2-foot light with adjustments.

Using 1 1/4" PVC pipe (purchased the 10' tube), we measured and cut 31" for the top piece and 20" for the two side vertical pieces.  The bottom pieces ("feet") are 8-9" on each side of the Tee connector.  I also purchased two tee connectors for the feet (1 1/4" size) and two elbows for the top (1 1/4"), as well as 4 end caps (1 1/4" size) for the feet.
The frame of the grow light stand
Although pvc glue was used on the feet/tee connector, we decided to not glue the top to the elbows so that it could collapse for storage off season.

My wonderful husband also had to make some adjustments to the light since 2' fluorescent lights do not usually come with a cord.  So he wired in the cord and attached it to a 2x4 piece of wood in order to be able to hang it from chains and s-hooks for adjusting as the plants grow. 

I think the plants look happy so far....only 6 days later!  Much happier than they would be if the were out in this March 25th snow we're having!

Sunday, March 17, 2013

Starting Seeds indoors (The Grumpy Gardener)

source
I'm grumpy.  My family knows it.  And I suspect many other gardeners in the Northeast are grumpy this weekend too.  We've set the clocks forward, the seeds are purchased, the crocuses are in bloom, but instead of getting to work in the garden, it's snowing.  Yup, my annual St. Patty's Day planting will have to wait.  It snowed yesterday, it's cold today, and there's a "bigger storm" coming tomorrow.  That's all the weatherman promises in the forcast.  Yippie, more winter.  Not what a gardener wants to hear.  So how does a frustrated gardener get to work anyway?  We start planting indoors.

If you've been following my gardening blog, you know from my post last Spring, I'm not an "innie".  I have no green thumb when it comes to growing plants indoors.  Previous attempts at houseplants have ended in their brown/withered death.  I have grown seeds indoors, but I hurry to get them outside before the mold begins to grow.  So this year, I'm setting myself up with the proper tools.  My husband is building me a grow light stand and I used my Christmas giftcard for a grow kit!  What better idea for a non-indoor grower than a "self-watering deep root system grow kit"!  Sign me up, send the UPS guy, my answer is here.
 
Purchased from Gardeners Supply, the reviews say it should be able to erase all my indoor growing deficits by doing what I haven't been able to do....properly water indoor seeds.  So after carving out a quiet piece of time in the day (ok, maybe the kids were still loud in the background), I got to work.  Oh, the smell of the dirt!  It may have been my kitchen, but I was transported to sunnier days outside in the garden.  And it might just be a seed, but it's the promise of things to come.  Nothing lifts a gardener's spirit than actually gardening. 


What I'm growing so far indoors are three cells each of three different types of non-GMO tomatoes (Moneymaker, Cherry, and Thessaloniki), and 6 cells of Romaine that I'll tranplant outdoors in a few weeks.  So it now sits on the floor with the lid on until the sprouts appear.  Once they do, we'll lift the lid and add the grow light.  Meanwhile, you'll find me outdoors on the first semi-warm day putting the rest of the spring crops in the garden:  lettuce, radishes, carrots, etc. Stay tuned. 

Saturday, February 9, 2013

I'm Dreaming of a Green Garden!

"Dream Garden" by Maxfield Parrish
You know you have the gardening itch when you start making up songs about your garden in the shower!  The blizzard hit New England last night and mostly missed us.  Still, the near miss of being buried in snow got me really longing for the days of gardening.  My broccoli are still in the garden and hopefully wintering over for Spring.   The heirloom seeds I orderered have already arrived in the mail.  Almost daily, the mailman brings me reminders through gardening catalogs and seed order forms (including the penny sale again!).  Oh, to be out in the garden!  So I share my song that I was singing to myself this morning.
I'm dreaming of a green garden,
 Just like the one I used to grow
Where the veggies glisten
And children pick them
I can't wait for gardens to grow!