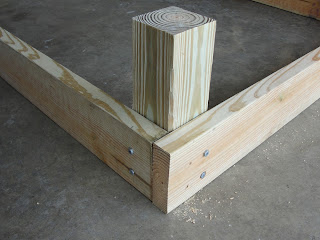
After two years of gardening in my original raised bed, I decided it was time to expand. Afterall, I had already expanded in the virtual world (thanks Tap Ranch!) so it was time to get to work at home too. However, I also need to share the backyard for the occasional activities of my kids. So we opted to build a smaller 4x4 raised bed. Here are the plans so you can build your own too.
Step 1: the Supplies
4x4 pressure-treated wood cut into 1-foot pieces (qty. 4)
2x6 pressure-treated wood cut into 4-foot pieces (qty. 4)
3 1/2" lag bolt zinc screws (qty. 16)
2 1/2" lag bolt zinc screws (qty. 8)
Post hole digger
Soil (I prefer a mixture that my mother-in-law swears by and has worked for me in the past: rich topsoil on the bottom, followed by humus manure and peatmoss.)
2 Bayer Aspirin for when you're all finished
Step 2: Begin Assembling
Begin by laying out the pieces and attaching the 2x6 pieces to the 4x4 wood with the 3 1/2" lag bolts into predrilled holes.
Notice the placement of the screws into the 4x4.
Continue working around until all four corners are attached. For extra reinforcement add the 2 1/2" screws into predrilled holes connecting the 2x6 pieces together. You would be surprised how many times my raised bed has been used by kids as a balance beam! These extra screws have kept it from falling apart. Continue to finish all four corners.
Step 3: Placement in the ground
Once the frame is assembled, position it where you want it. You'll need to mark the corners and begin digging holes with a post hole digger. Thanks to my neighbor for letting us borrow hers!
Once the holes are dug, flip the frame over into the holes. Make sure it rests evenly into each hole. If not, dig the holes deeper or larger as needed.
Step 4: Fill your raised bed
This is where I took over after the bed was built. In the past, we dug up all the grass which was REALLY tiresome! So this time I'm trying the method pinned around the world on Pinterest. Simply lay paper over the grass. I chose the leaf bags as my base since they are biodegradable. They kill the grass but disolve over time.
Next add the soil and enjoy planting!
If you want a traditonal 4x8 bed, just modify your 2x6 wood pieces to have two pieces 8' long and two 4' long. The rest of the steps are the same.
Linking up at the Clever Chicks Blog Hop
Monday, April 15, 2013
Friday, April 12, 2013
Crazy Weather: When to Plant Tomatoes
 |
| Source |
While checking out at the grocery store, I overheard the cashier saying how he had just planted his tomato plants that he bought at Home Depot. I wanted to lean in and tell him it was too early to plant, but my advice would have been too late. Then I arrived home and noticed that my own tomatoes under the grow light look like they should in late May. Apparently the grow light works! I had to wonder if I could break the rules and be like the cashier, recklessly putting them in the ground whenever my gardener's heart desired! But I know better. Mother Nature bit me last year with a final late frost on April 27! So when to plant? |
| Just 3 weeks after planting, they're getting so tall, I'm running out of room to move up the grow light! |
Meanwhile, the best planting date is still later. My grandfather always said to wait till May, preferably Mother's Day weekend or later. Afterall, it was April 27 last year when I took a chance and watched my sprouts get frostbitten. If we do get hit with another frost, just remember to cover your plants. Happy Planting!
Linked up at: The Clever Chicks Blog Hop
Subscribe to:
Comments (Atom)


